CLICK HERE FOR FREE BLOGGER TEMPLATES, LINK BUTTONS AND MORE! »

Tuesday, August 9, 2011

My Cake Marathon, Part 2

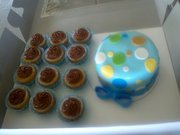
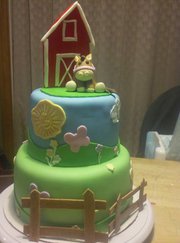
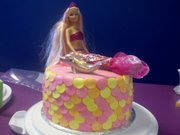
Just after the Glitter Guitar cake, it was time to get busy on one that another co-worker ordered.  I was a little disappointed with this one because I had a vision on how I wanted it to look and I just couldn't quite translate that vision onto the cake.  I learned a few lessons with this one:  1 - white fondant is very difficult to work with.  Now, I mentioned before that I do wash my hands constantly while working with cakes but I  still managed to get a finger print on this one.  I was marking and placing dowels for support then picked up the top tier and set it on the bottom.  Surprise!  I had chocolate on my hands from the dowels and left a nice hand print on the side of the cake.  I didn't have time to redo it to I wiped it off as best I could and explained that the cake wasn't dirty, it just had extra chocolate on it.

I was torn, because I wanted the cake to be perfect because it was for someone from work, but then again, I know that my co-workers were aware that this is a hobby and I'm not a professional by any means.  I still ended up giving her a discount because it wasn't quite right.

The second lesson I learned, which I posted about earlier was refrigerating a fondant covered cake.  I knew not to touch it because of the condensation, but learned that the fondant will stretch a little when it warms up if you have a nice big, heavy flower attached to it.  I started to pull away from the cake some.  So I don't know yet how I would have fixed the flower issue but next time, I will wait until the last minute to attach it.

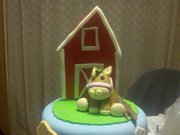
This was a going away cake for Amber.  The back side of it says "you will be missed."  I enjoyed working with her, best of luck Amber in your future endeavors.  


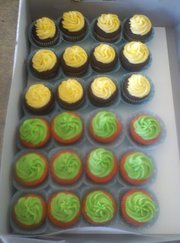
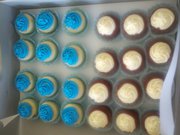
The third order I had was due the day after Amber's cake was due.  It was for 4th of July cupcakes.  Fortunately, I got to choose what kind.  So to make things easier on me, I used the extra batter from Amber's cake to make white cupcakes and the left over raspberry buttercream to decorate them.  Throw in some red and blue cupcake liners and I'm all set with a simple red, white and blue dessert.  I added the little decorations on the top at the last  minute to dress them up.  They were originally star garland that I cut down and wrapped around treat sticks then stuck them in the cupcakes.  Pretty AND scrumptious!


The Start of a Cake Marathon

Word is starting to get around, I make good cakes.  I'm not bragging, it's just that the circles I play in are used to boxed mixes or store bought cakes and there's just something about homemade - well, mostly homemade.  Many of my cakes do start out as a box mix but then they get doctored up a bit and they taste really scrumptious.  I'm still working on the cute/pretty/cool part, but I'm getting there.  

So beginning the last week of June in to the 2nd week of July, I had a total of 10 cake orders.  That doesn't sound like much but when you consider the fact that I make my cakes in my own kitchen with no counter space and no refrigerator space, throw in 3 kids, a husband and a job who all demand my attention, and this turned out to be quite a feat.

The first cake was for hubby's niece turning 9.  She loves music, especially Taylor Swift.  So what better theme for her birthday than Taylor's guitar?  Now, I know her music and could probably pick her out of a line-up, but never did pay attention to details of the rich and famous.  I don't know who wears what or how many kids they have, half the time I can't even tell you who sings that song.  So I pulled out my trusty laptop and started Googling (is that even a word?).  I had no idea how many guitars that girl uses!  Of course there is one that any nine year old girl would swoon over, the glitter guitar.


I have never used edible glitter so this was another learning cake for me.  I used a silver spray paint (edible, of course) underneath the glitter to help keep it looking shiny.  I had a hard time getting a true black in the neck for some reason and it ended up looking purple.  And I cheated a bit and used the Wilton guitar shaped pan.  I had another cake coming up in that same shape so for the sake of all things easy, I broke down and bought the pan.  Over all I am pleased with the way it turned out.


A Unique Cake for Father's Day

Last year hubby didn't get anything for Father's Day.  Don't remember exactly why but it probably had something to do with my spending habits and lack of planning ahead.  Hubby gets the short end of the stick often.


So this year the kids and I went out of our way to make sure he knew how special we think he is.  The kids made lots of crafts and special things for their daddy and I spent hours on top of hours finding the perfect watch for him.  Of course, there was also cake.  He likes Boston Cream Pie donuts from a popular coffee chain so when I came across a recipe for Boston Cream Pie Cake, I knew what we were making for him.  


Let me tell you, this was the most labor intensive cake I have ever made!  There was the cake and the cream filling and the chocolate ganache.  For a girl with the attention span of a 3 year old, it was pure torture.  Although I have done more detailed cakes, I can usually begin the decorations a few days ahead of time and throw the ingredients for my icing in my kitchenaid and let it do all the work for me.  This time there was continuous whisking over the stove and heating then cooling then reheating.   And it all had to be made in the same day.  This cake is literally meant to be eaten immediately.  You can tell I began to lose interest because chocolate ganache is not supposed to be lumpy.  I rushed things and that is what happens when you have no patience left. 


But after all the love I put in to it, the Boston Cream Pie Cake was a big hit.  Hubby and the kids had no problem making sure there were no left overs.


Sunday, August 7, 2011

Lemon Cupcakes

My husband and I both like to take cupcakes in to work to bribe the co-workers in to thinking we are fabulous.  And I needed a reason to make my Amazing Lemon Cake recipe again.   I was dreaming about the cake I made for mother's day.  This time though, I didn't use the filling, I just made lemon cupcakes with raspberry buttercream.  Although I liked them better with the filling, they were still scrumptious!


For my lesson learned this time, I tried a new technique with the icing.  To make the swirls on the cupcakes, put just a touch of gel food coloring in your piping bag and smear it all over the entire bag.  A little goes a long way.  Then, fill the bag with icing and swirl your cupcakes like normal.  What you get is just a touch of color on the edges.


Tuesday, August 2, 2011

My First Paid Order!

The majority of the cakes I have done so far have been for family and a couple for friends - all of which won't mind some imperfections on the cakes.  But when I received my first real "order" for a cake, I was ecstatic and terrified at the same time.  It was a high dollar order ($100) and it was for an acquaintance of a second cousin.  It had to be perfect.  The order was for 5 different flavors of cake, three different flavors of icing and the customer had a very specific picture in mind.  She wanted a dozen each of the cupcakes:


Red velvet with cream cheese icing
Chocolate, yellow and strawberry with vanilla buttercream
white cake with chocolate icing


Then for the smash cake, yellow with vanilla icing.  Fondant covered with polka dots for a little boy turning one. 


Simple enough, right?  Well, it should have been.  And it would have if I didn't have to learn so much with this order.  

First of all, this order was due during the first really humid week of the year.  I hadn't turned the air conditioner on just yet because it was still cool enough at night to keep the house cool for most of the day.  Lesson learned: icing and fondant do NOT like humidity.  

So to keep the cake from completely melting on me, it made several trips in and out of the refrigerator.  Unfortunately this caused a great deal of condensations and I didn't learn until a few cakes later that this is ok and JUST DO NOT TOUCH IT UNTIL IT DRIES!  Since I didn't know that, there were several fingerprints on the cake because I could not keep my hands off of it. The original design called for a lot less polka dots, but I needed them to hide the flaws I continued to create.  

The third and final lesson learned: use paper towel to try your hands.  I was my hands a lot while making cakes and always use paper towels to dry my hands, so when I ran out toward the end it didn't occur to me that using a regular hand towel would wreak such havoc.  Unbeknownst to me, my beautiful new red hand towel left red fuzzies all over my hands.  Once they were clean and dry, I used my hands to smooth the cake and ended up a gazillion red fuzzies everywhere.  Now, if the fondant covering the cake was dry, this wouldn't have been such an issue, but it was sweating so they stuck and there was no way of getting them off.  Believe me, I tried.

The mom was thrilled with the cake and the cupcakes and colors and had no idea what went into such a simple order.  

A Beautiful Cake for a Beautiful Woman

I am very excited by all of the things I am learning while making my cakes.  While I am in no way a professional, I am quite proud of what I have taught myself to do.  For mother's day this year I wanted to show off what I have learned and honor my mother like never before.  Her favorite flavor of all sweets is lemon, so I went with a lemon cake, torted and filled with raspberry puree, then covered with raspberry butter cream and decorated with fondant.  My original vision for this cake was far different than how it turned out but this is still my very favorite of everything I've ever done.  I don't know if it's because of who it was for, the flavor combination or the simplicity of the design.

My mom and youngest daughter


The flower was my first time using gumpaste.  I gut out individual circles, used a ball tool to ruffle the edges and stacked them to look like a flower.  The flower's center, leaves and stem are all regular fondant.  It is difficult to see in the photos but there are also teeny tiny little pink pearls around the bottom of the cake that dressed it up even more.  

The photos definitely do not justify this cake, I have GOT to stop using my cell phone to take pictures these cakes!  I see some food photography lessons coming in the near future (:
To apologize for the poor picture quality, I am posting the recipes I used for the cake.  Both came from my most trusted site, cakecentral.com


Amazing Lemon Cake
1 box Duncan Hines white cake mix
1 cup all-purpose flour
1 cup granulated sugar
1 box Jell-O brand instant lemon pudding mix
1/2 tsp salt
4 whole eggs
1 1/3 cup water
2 Tbsp vegetable oil
1 cup (8 oz) sour cream
1 tsp clear vanilla flavor
2 tsp lemon extract
Zest and juice from 2 large lemons (I did not use the zest and it still turned out scrumptious)


Mix all the ingredients together,pour into greased cake pan, bake at 325 until toothpick comes out clean.


Raspberry Filling
(Read instructions all the way through before beginning - I did not the first time and it was more complicated than I expected)


2 12 ounce packages of frozen raspberries (not packed in syrup)
1 1/3 cups water1 1/2-2 cups granulated sugar 2 T of lemon juice 5-6 T of cornstarch dissolved in 1/2 cup of water


    In a saucepan combine the raspberries, water, sugar, and lemon juice. Bring to boil and simmer for 15-20 minutes or until the raspberries have broken down. Remove the mixture from the heat and strain with a fine mesh sieve. Return the stained mixture to the heat. Dissolve the cornstarch in 1/2 cup of water. Whisk the slurry into the raspberry mixture. Bring the mixture back to a boil and simmer for 5 more minutes, stirring occasionally. Remove from heat and cool completely. It will take awhile to set up. It will thicken like a jelly. May stir it for easier spreading on cake.

Raspberry Butter Cream 
(a scrumptious twist on my basic recipe)

1 stick butter (unsalted)
1 stick butter (salted)
1 cup shortening
2lb bag of confectioner’s sugar
2 teaspoons raspberry extract
5-6 tablespoons of milk (cold)


    Cream butter and shortening. Add raspberry extract then add confectioner’s sugar. Allow confectioner’s sugar to blend well then add milk. For thinner consistency, add more than 6 tablespoons of milk.


Another New Twist on an Old Favorite

After finding a scrumptious carrot cake recipe, I had to put it to work on a farm cake.  Little Dakota was certain that he wanted a cake with cows, chickens and pigs.  I used Anabel's horse cake as my base and switched things ups a bit.  With everything I learned from hers, I changed a few things and fixed a few things.  Instead of fondant, I went with a cream cheese frosting which I learned does not decorate well.  

I took out some of the butterflies and flowers and added a few sunflowers and the apple tree.  Overall I was very pleased with the barn, the chickens and the pig.  My cow looks like he's has a few beers too many, I wish I would have used the same method for the horse on Anabel's cake.   

The top layer was carrot cake and the bottom was french vanilla.  Dakota and his Nana were very happy with the final product and we already have plans for a fun cake for his little sister in September.


Thursday, June 16, 2011

Cupcakes, Just Because

Recently, a friend from work asked me to make a cake for her grandson's 3rd birthday.  Little Dakota's favorite flavor is carrot cake, it's not a flavor I have regularly, nor is it one I know a whole lot about.  I couldn't honestly tell you what a good carrot cake tastes like, so it's time to experiment!


Most of my recipes, tips and ideas come from cakecentral.com.  It is a wonderful site with cake decorators who have just made their first cake to those who are published in magazines and are on tv.  And to make things even better, it is a totally free site!


So, my first carrot cake recipe, I made for the family.  It had ok flavor (again, who am I to judge) but it also had quite a bit of texture.  While I am far from a picky eater, I don't like that many chunks in my cakes.  The second recipe tasted much better (to me) and I pulled out the dreaded food processor to make all the bits smaller.  It turned out quite scrumptious, and topped with home made cream cheese icing.  The recipe I went with was from Subee on Cakecentral.com, but with a few tweaks


  • 3 cups of shredded carrots
    4 eggs
    1 1/2 cups granulated sugar
    1/2 cup brown sugar (light or dark)
    3/4 cup orange juice
    1 cup sour cream
    1 cup vegtable oil
    1 tsp. vanilla
    3 1/2 cups all purpose flour
    1 tsp. cinnomon
    1/2 tsp. nutmeg
    2 tsp. baking soda
    1 tsp. baking powder
    3/4 cup coconut
    3/4 cup chopped walnuts
    1/2 cup crushed drained pineapple, plus 1/4 cup pineapple juice

Instructions

    Preheat oven at 325 degrees.
    Add wet ingredients mix well, add dry ingredients mix well.
    Use food processor to finely chop walnuts, then add carrots, pineapple, and coconut and pulse until mixture becomes a soft mash.
    Add mash to wet and dry ingredients and mix gently.
    Pour into prepared pans and bake until knife comes out of center of cake clean.


Although I decided this recipe was scrumptious enough to call mine, we just couldn't eat any more cake (who would have thought any one could get tired of cake).  But if I was going to pawn them off on someone, it just didn't feel right unless I made them pretty.


      The picture doesn't quite do it justice, but they were pretty, and gathering there were no left overs at the family I took them to.

        Wednesday, June 15, 2011

        A New Twist on an Old Cake

        After Anabel's horse cake and everything I learned with it, I suddenly gained some confidence in my cakes.  My next cake was for one of my Husband's co-workers, (well actually it was his boss) so it had to look good.  My husband takes most of the extras and rejects in to work to share with his buddies, and even the ugly ones are still scrumptious, so it was just a matter of time before someone asked for a specific cake.


        This one was for Kameron who was turning 2 and was another Disney Cars fan - it seems I'll get my money's worth out of that Wilton pan after all.  This time I wanted to do something a little different and chose to cover the cake in fondant.  I found pictures of 3 or 4 other cakes that I liked and made my own version of the combination.  Here's what I came up with:


        This is also a 2 layer cake, white with vanilla butter cream.  From what I hear, the birthday boy loved it.  I think I'm going to have to start delivering my cakes so I can see the faces of the recipient.  

        Since this is my learning blog, I learned that it's ok to think out of the box and that I see way more of the imperfections than the others.  If someone doesn't regularly make cakes themselves chances are, they don't notice most of the imperfections.

        Eventually as my confidence builds, I will start sharing what I learned with you.  I am 100% self taught.  I'm too cheap to take classes, so I spend a great deal of time researching how-to's.  Eventually my goal is to get everything in to one place for other beginners out there.

        Monday, June 13, 2011

        A Cake of Firsts

        With each cake I finish, I wind up with a new request.  After my kid's party, my niece asked if I would make her a horse cake for her 7th birthday.  Hers was the first of many things for me.  First tiered cake, first cake fully covered in fondant, first attempt with gum paste and first figure on a cake.


        We used the same flavors as with Gracie and Brian's cakes and home made marshmallow fondant to cover the cake.  Even as a newbie I can see plenty of errors in Anabel's horse cake, but I had a lot of fun making it and learned quite a bit.  I now understand why many people who use fondant have some sort of decoration on it as well - to hide imperfections!


        I love the little horse on this cake, I found a video on Youtube with step by step instructions on how to make him.  Much better than the first one I made, LOL!

        Saturday, June 11, 2011

        Finally,Cake for my own Kids

        For those of you who know me, my attention span is VERY short. After doing two cakes out of butter cream, I decided to move on to bigger and better things even though my icing technique was far from perfect.  Break out the fondant (btw either pronunciation is correct - FON-dent or fon-DANT)!


        My adorable 3 year old wanted Disney's Toy Story for his party, but he doesn't have a favorite character. After searching for days for a style that I wanted to try, I settled on this:

        Buzz on the front

        Woody on the back
        Brian's cake was chocolate with peanut butter filling, SCRUMPTIOUS!!!  I iced his cake and added fondant decorations (can you tell I forgot to smooth the icing first?).  Most importantly, I learned that fondant  does not dry hard as you can see Buzz's wing falling apart after just a few minutes from the back of the cake (I will tell you all about Gum paste later).

        We decided to combine my daughter and son's birthday parties for the first time, and a 6 year little girl wants nothing to do with Toy Story, for her, it was all about mermaids.  Gracie always picks some random idea for her birthdays and they are usually very difficult to find and decorate for.  She would have nothing to do with Ariel, she wanted a regular mermaid.  Here's what I came up with:


        The little circles are meant to resemble the scales of a mermaid's tail.  Lesson learned for this one - don't try two brand new cakes at the same time, you (and by you, I mean I) will become bored and rush through to get the cake done.  My lack of attention span got the better of me.  I rushed out to get a mermaid Barbie to finish off the cake, fortunately Gracie thought that was the greatest thing ever.  Her cake was white cake with strawberry cream cheese filling, also SCRUMPTIOUS!

        Butter Cream and Piping

        So, the pretty little stars and flowers on cakes aren't as easy as they look.  Not for me anyway.  My second cake was for another nephew who likes Disney's Cars.


        The car on top is a Wilton pan with detailed instructions to decorate.  I don't remember what the flavor of the cake was, but the icing was homemade vanilla butter cream.  I learned lots of things with this cake:


        • Color the icing the night before, most colors will deepen over time
        • Too much color changes the texture of the butter cream
        • When the icing gets too warm it doesn't hold shape of any kind.  It IS ok to put it in the fridge for a bit to set back up.
        • Just because the pan you baked the cake in is straight, doesn't mean the edges will be perfectly straight.  When piping edges, eyeball a straight line, don't follow the edge of the cake.

        How It All Started

        Until I had kids, making cakes never crossed my mind.  It wasn't until I started planning birthday parties that I really started paying attention to the cake.  It is, after all, one of the main attractions for a kids party, and my obsessive compulsive attitude toward a few certain things, meant that the cake had to match the party theme.


        The first few parties went well, I found a chain store that would make a cupcake cake the way I had pictured.  Then suddenly, they stopped; the cakes started looking bad and only got worse.  I made a few attempts at making cakes my way, and while they were cute, they definitely looked home made and tasted like a box mix.  So, back to the chain stores I went.  After a soccer ball cake gone bad, and frantically searching the entire city for an iCarly cake that couldn't have taken more than 5 minutes from start to finish, I vowed never to buy a cake again.


        I found a great starter kit from Wilton and started scouring the web for how-tos.  My sister was gracious enough to let my first real attempt at a cake be for my nephew's 8th birthday.


        Aiden's cake was chocolate cake with homemade chocolate butter cream.  The character is a Lego Obi Wan done with a frozen butter cream transfer.  If you know Legos or Star Wars you may recognize what I attempted.  I learned a lot with this cake and while it didn't look as perfect as I had envisioned, it was definitely SCRUMPTIOUS!